Getting started with Meta Quest using Unity
The Meta Quest series of headsets (previously known as the Oculus Quest) are by far the most popular standalone, all-in-One virtual-reality headsets in the market. The Meta Quest 2 is absolutely a great virtual-reality hardware, providing a high-fidelity immersive experience to users.
Though the Quest 2 comes with a built-in processor and runs on Android, the headset can still be used for PCVR with a VR-ready computer using Oculus Link (over USB) or Air Link (over Wi-Fi). In this guide, we will focus on setting up the Meta Quest 2 headset for standalone development using the Unity engine.
Prerequisites
Before we get into Unity for the development, ensure you are ready with the following
- Meta Quest 2 : Have your Meta Quest 2 headset with a USB-C cable. Our target development platform will be Android in Unity and we will be pushing the build through the Android Debug Bridge.
- Unity Engine : We need the Unity engine installed with the Android development module installed (Unity Android module, Android SDK, Android NDK). Basically, your Unity installation must be able to switch a project to the Android platform and generate successful builds.
Enabling Developer Mode for Meta Quest 2
In order to push and preview your builds, you need to list your Meta Quest 2 as a development device by enabling the Developer Mode. You can use the Meta Quest mobile app (iOS/Android) to enable developer mode.
You should be signed in with the same meta account on the headset and mobile app.
- Power on your Meta Quest 2 headset and ensure it's connected to the internet.
- Open the Meta Quest app on your mobile device and click Menu at bottom right.
- In the screen that appears, select Devices
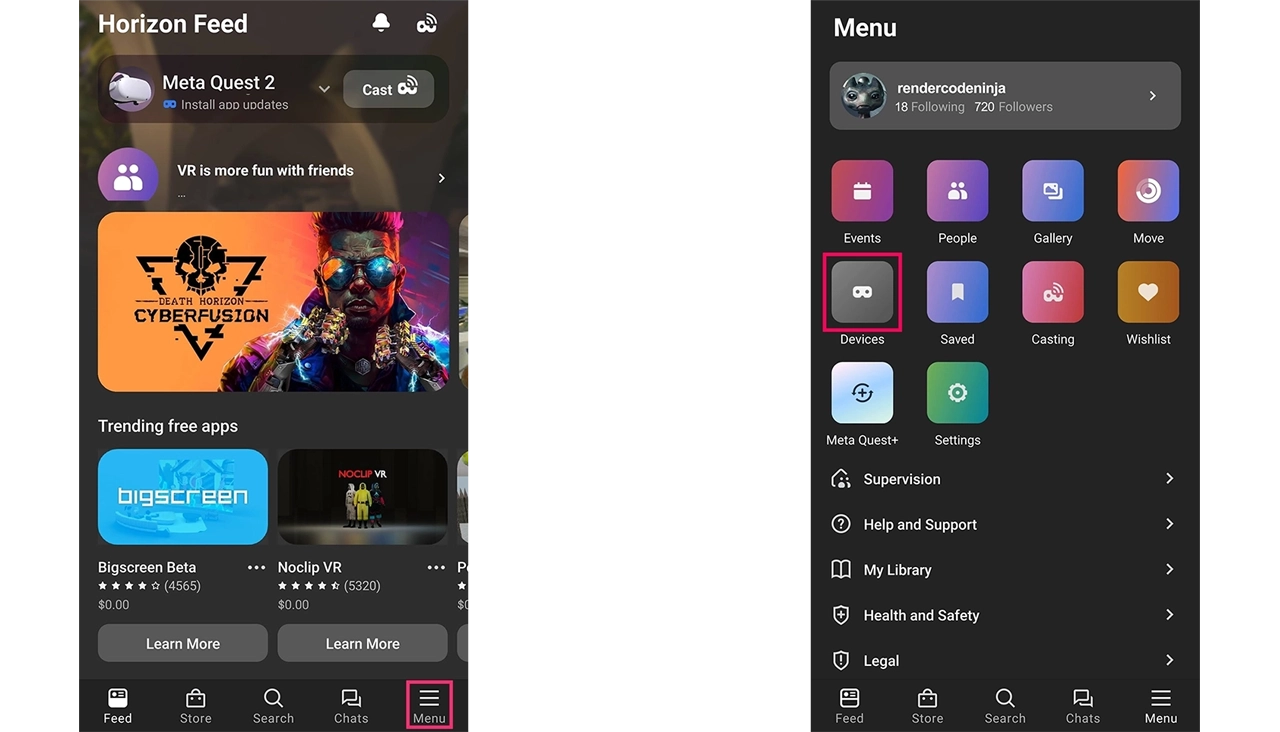 Fig 4.1 Meta Quest App - Home (left), Menu (right)
- Make sure the device you wish to enable Developer Mode is selected from the drop-down.
- Also, ensure it's connected to the app. Otherwise, click Connect to enable connection between the app and the device.
- From Headset Settings, choose Developer Mode and toggle on the developer mode option.
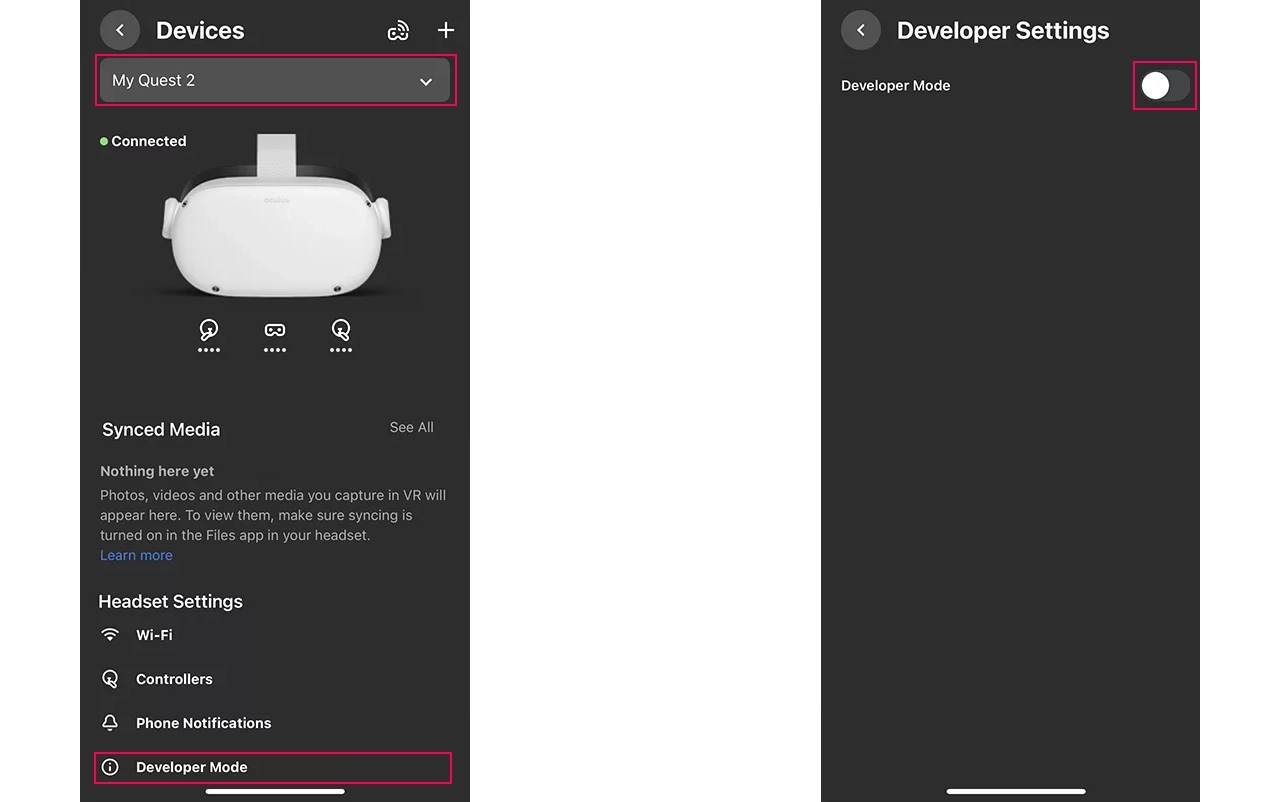 Fig 4.2 Meta Quest App - Devices (left), Developer Settings (right)
That's it! Your Meta Quest 2 headset is now enabled with Developer Mode. If you connect your headset to a PC via a USB cable, it will list under the Run Device field in the Build Settings window for the Android platform in Unity.
Alternatively, you can run the following command to see if your headset is listed as development device. This command will list all the Android devices connected with developer mode enabled and USB Debugging authorized.
bash
adb devices -l
Setting up the Unity project
For creating VR experiences you have two options.
- PCVR - Requires a powerful computer where all your computations and rendering happen within the Desktop/Laptop and the headset is used as a display device. The video feed from the computer is transmitted over wired or wireless to the VR headset.
- Standalone VR - In this approach, your executable runs inside the VR headset and doesn't depend on any external computing devices. The Meta Quest runs on Android OS (Qualcomm Snapdragon XR2 chipset), so you need your executable to be an Android build installed on the device to run the VR experience.
In this guide, we will use the latter option to create a standalone Android build using Unity by implementing Unity's XR framework capabilities.
Create a new Unity project (or you can use an existing project) to start with and the rendering pipeline can be your choice as the built-in or URP. You need to set the project's target platform to Android first.
Change platform to Android
Go to File-> Build Settings. Select Android and click Switch Platform. If the Android option is greyed out, install the Android Platform module using Unity Hub.
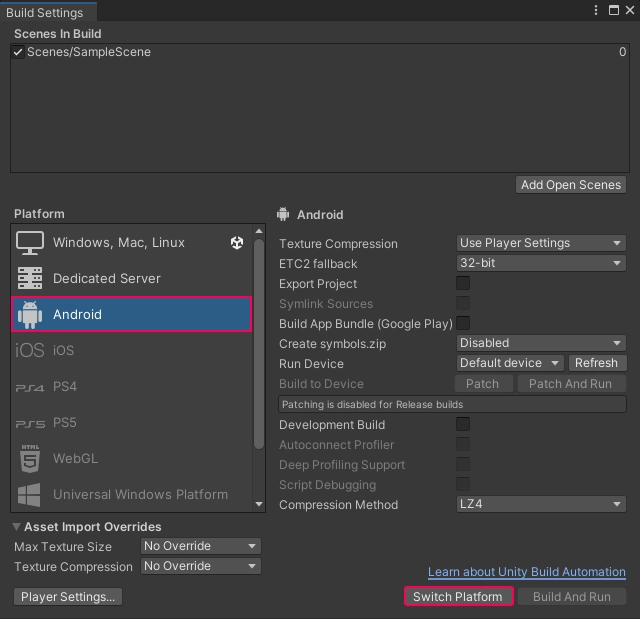 Fig 4.3 Unity Build Settings - Android
Install XR Dependencies
The project is now Android compatible but not yet ready for the Meta Quest. For that, you need to install certain dependency packages and luckily these are provided by Unity and are available in the Unity package registry. We will be needing 2 packages which are the XR Plugin Management and the XR Interaction Toolkit.
Go to Window-> Package Manager and install the packages.
- XR Plugin Management - This package provides simple management for multiple XR plug-ins. Simply it lets Unity understand what devices are we targeting. By providing us with an interface to select the target platform (PC/Mobile) and target framework (OpenXR, MagicLeap, Oculus, WindosMR), we get to configure of project for the target VR device hassle-free.
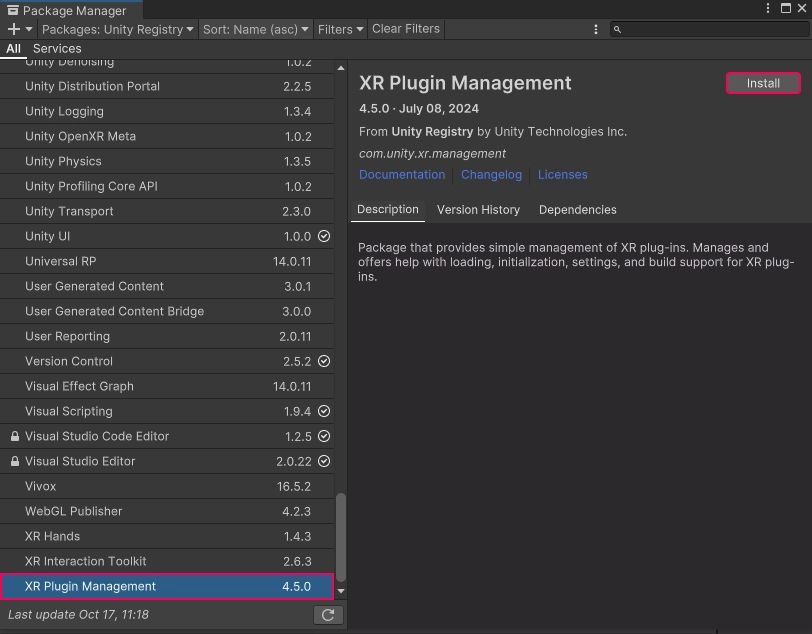 Fig 4.4 Unity Package - XR Plugin Management
- XR Interaction Toolkit - This includes a collection of component-based systems that provide frameworks for creating XR experiences, interactions, handling cross-platform inputs, and such. You will also need the Starter Assets samples from this package which has pre-created action maps for the input system. Without this, we would have to create our action maps on our own from scratch which can be a tedious job.
The XR Interaction Toolkit utilizes the New Input System from Unity and if your project is using the old one, an editor restart is required to change it to the new one.
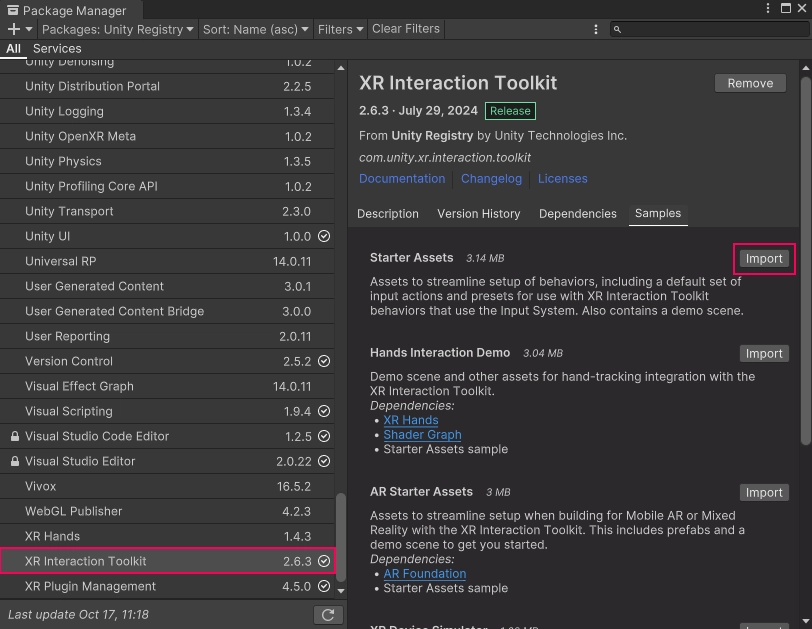 Fig 4.5 Unity Package - XR Interaction Toolkit
Configure XR Plug-in Management
Now that we have the required dependencies installed, let's configure the XR Plug-in Management first.
Go to Edit-> Project Settings-> XR Plug-in Management
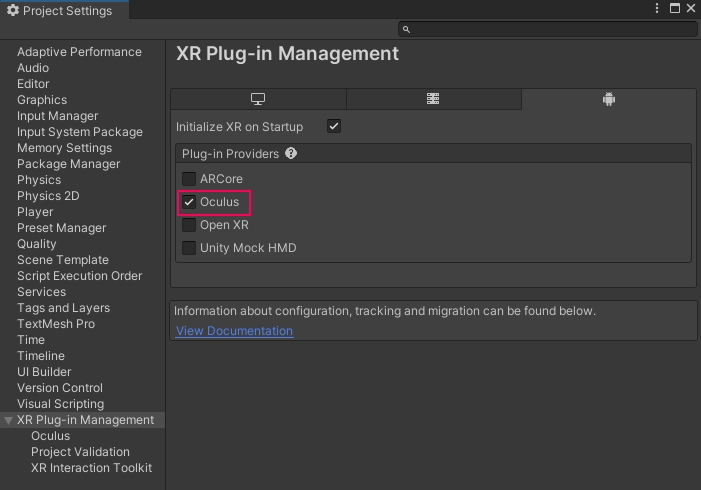 Fig 4.6 Project Settings - XR Plug-in Management
We are going to set Oculus for Android as our plug-in for this project. If you take a closer look you can see other options such as AR Core, OpenXR. The AR Core is for creating Augmented Reality experiences for supported Android devices. OpenXR on the other hand is more like an open standard that provides a common API for developing XR experiences across multiple hardwares rather than using individual frameworks. For now, we will stick with Oculus as our plugin for the Meta Quest 2 development as we are only targeting one device.
Setting up the scene
On successful installation of the dependencies, we get additional components for creating our VR experiences which we are going to implement now. Select and delete the Main Camera object so that we can replace it with a XR Rig system.
Right-click over the Hierarchy panel and choose XR-> XR Origin (VR) to add the XR Rig as shown in the right image.
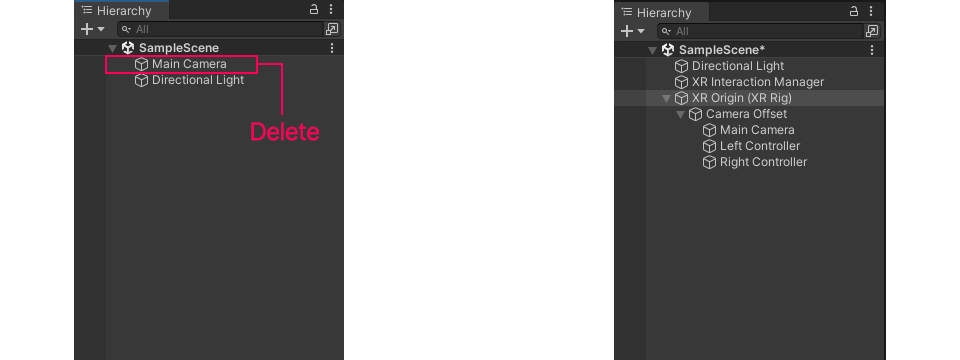 Fig 4.7 Default Camera replaced with XR Origin (XR Rig)
If you take a look at the Left Controller or Right Controller gameObjects, the action reference fields are empty which means no actions are mapped for those specific functions.
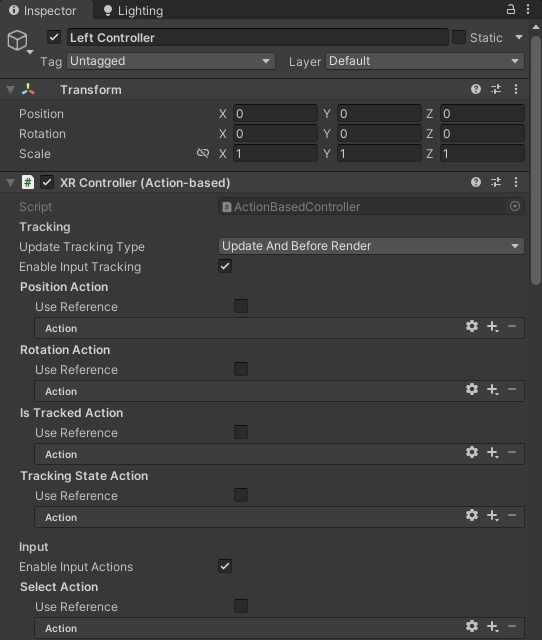 Fig 4.8 XR Controller - Action references missing
Here's where the starter assets from the XR Interaction Toolkit come in handy. We need to map those action presets here for both left and right XR Controller (Action-based) components. But mapping them one by one can be a bit of work, so there is a quick workaround. Go to the Presets folder under XR Interactive Toolkit Starter Assets and select XRI Default Left Controller.
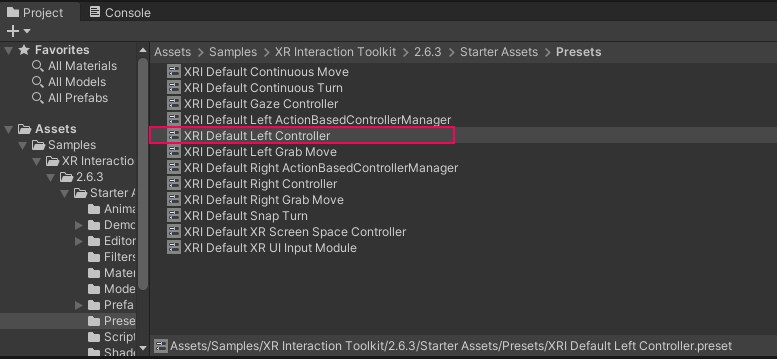 Fig 4.9 Default controller presets
With this preset asset selected, click the button named Add to ActionBasedController default at the top left of the Inspector panel. Do the same for the right controller by selecting the XRI Default Right Controller preset asset.
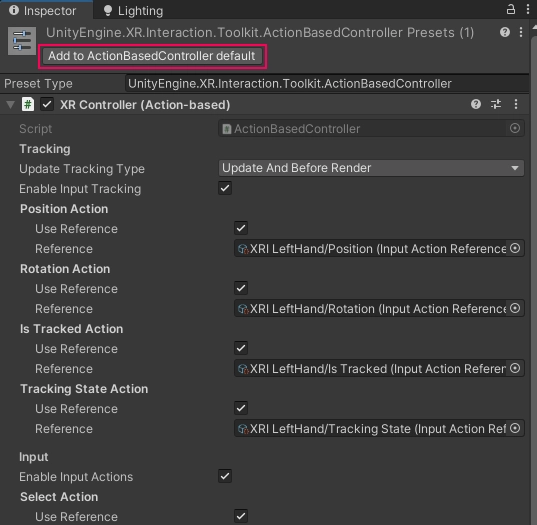 Fig 4.10 Add controller preset to Preset Manager
This will add both left and right action maps for meta quest controllers to Unity's Preset Manager. You can verify this by going to Edit-> Project Settings-> Preset Manager. Simply enter the values 'left' and 'right' against corresponding presets so that Unity may recognize which preset needs to be applied for which XR Controller (Action-based).
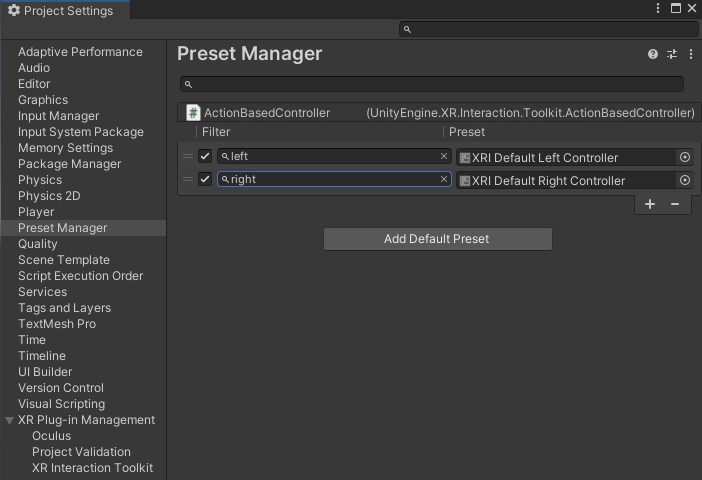 Fig 4.11 Preset Manager - Add filter keys
This enables Unity Editor to map the action maps automatically for both controllers when you add an action-based XR Rig. In the hierarchy panel delete the XR Origin (XR Rig) you added previously and add it again. This time, if you check the left or right XR Controller (Action-based) components, you will see the required actions are automatically mapped.
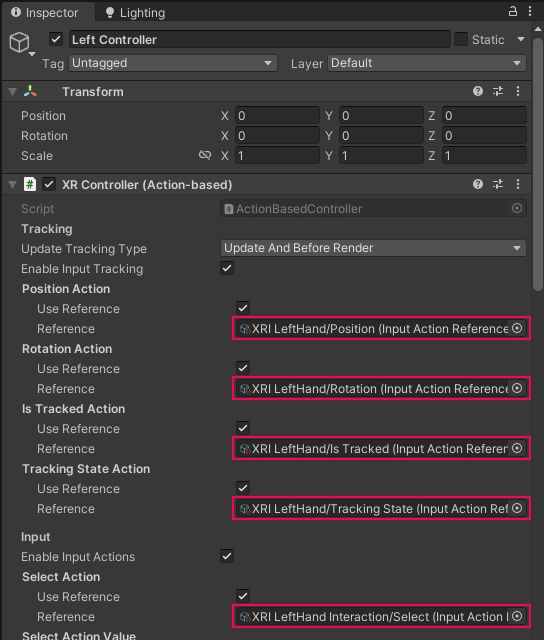 Fig 4.12 Preset Manager - Action references mapped
One last thing you need to do is to ensure that the scene has an InputActionManager component added and has the XRI Default Input Actions preset asset assigned.
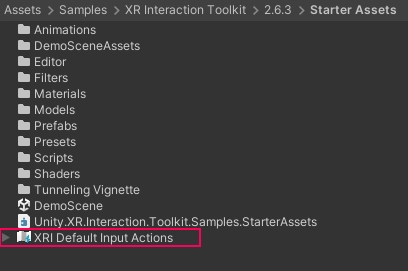 Fig 4.13 XRI Default Input Actions starter asset
Select the XR Origin (XR Rig) object and add the 'InputActionManager' component if it's not already added. You can also add this component to a new empty gameObject if required, but make sure only a single instance of this component exists in the Scene. This component has an 'Action Assets' array field. Create a new entry and add the XRI Default Input Actions preset asset from the XR Interaction Toolkit starter asset folder.
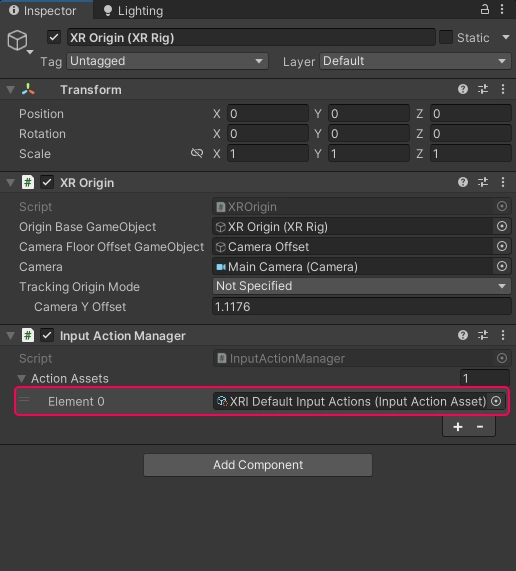 Fig 4.14 XRI Default Input Actions assigned to InputActionManager
That's it! Your scene setup is done. If you connect your 'Developer Mode' enabled Meta Quest 2 headset and generate a build, you should be able to view your project in VR. What is happening here is that the head position and orientation values tracked by the device sensors get transformed and applied to the Unity Camera. And the tracking value from the hand controllers gets applied to the left and right controller gameObjects within Unity. So any child gameObject of the 'Left Controller' and 'Right Controller' gameObjects will track and move with the controller.
To understand it better, create two Sphere objects and add them as a child of the 'Left Controller' and 'Right Controller' gameObjects. Set the scale to 0.2f on all axes for both the sphere objects. Now build the project to the device and you can see the movement of the spheres is in sync with the controllers. You can also download Meta Quest 2 controller models from Oculus Controller Art page and replace the spheres with them.