Creating Dynamic Link Library for Unity
A Dynamic Link Library (DLL) is more like a container to encapsulate code and resources that can be shared and used simultaneously between programs thereby reducing redundancy and improving efficiency. The use of DLLs helps promote modularization of code, code reuse, efficient memory usage, and reduced disk space. So, the operating system and the programs load faster, run faster, and take less disk space on the computer.
Now you might be wondering how this helps in developing Unity applications! The Unity engine allows developers to use external DLLs written in C# or C++. Let's take a look at some of the benefits of compiling code into Dynamic Link Library.
-
Performance Optimization
Performance-critical operations or complex calculations can be implemented in a lower-level language like C++ and compiled into a DLL. This optimized code can then be accessed from Unity, improving performance in specific areas where native Unity capabilities might be less efficient. -
Code Reusability
Since Unity allows DLLs written in languages like C# or C++, by integrating these external DLLs into Unity projects, developers can reuse existing libraries, algorithms, or functionalities that are not natively available in Unity. -
Organization and Encapsulation
By separating functionalities into DLLs, developers can create modular and encapsulated code, making the project more organized and maintainable. Also, the DLL can be shared between projects to reuse functionalities. -
Third-Party Plugin Development
Many third-party SDKs or plugins come in the form of DLLs. Integrating these external libraries into Unity projects enables access to additional features, services, or tools not available in the Unity ecosystem. -
Platform-Specific Functionalities
DLLs can contain platform-specific code. For instance, if there's a need to access platform-specific features or native APIs (like specific hardware functionalities or system calls), DLLs can serve as a bridge between Unity and these features.
Prerequisites
- Unity Editor - Version of your choice.
- Visual Studio - To compile and build C#/C++ code into a Dynamic Link Library file, you need to have Visual Studio installed on your machine. This enables you to set up a library project so that the source code you write gets compiled into a library rather than a binary. I'm using Visual Studio 2019 at the time of writing.
Building your code into DLL
Start by creating a new Visual Studio project. We will be using C# as the compiling language to build the DLL targeting the Dot-NET Standard. Choose Class Library as the project template. This ensures that your source code gets compiled into a library (DLL) instead of a binary. Proceed with the New Project wizard by choosing a save location for the project.
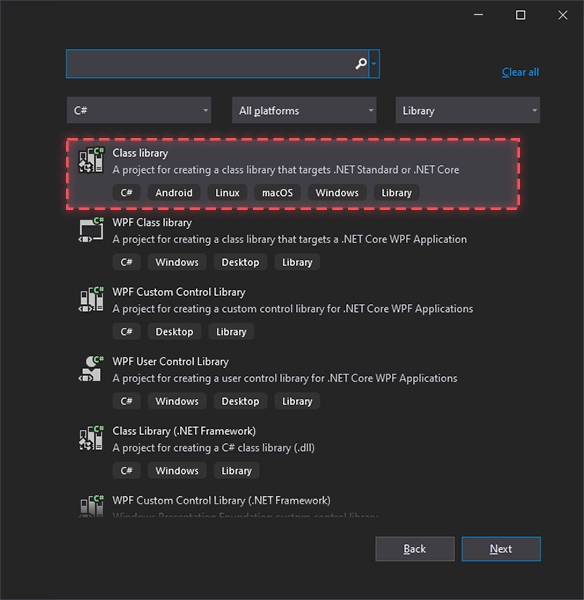 Fig 1.1 - Select Class Library as template
Additionally, set .NET Standard 2.1 as the target framework for this library project.
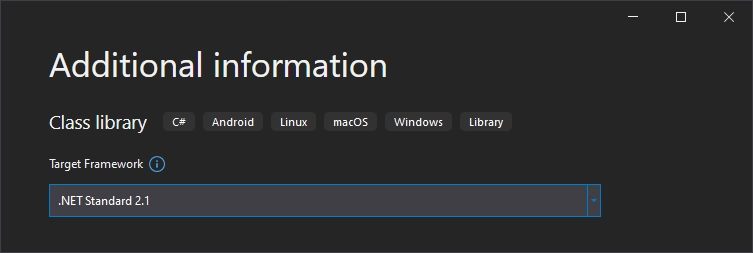 Fig 1.2 - Select target framework
This will create a new project with an empty class file within a namespace. You can notice that the project's name is used as the default namespace. For the sake of convenience, the class name (including class filename) is renamed to Utilities
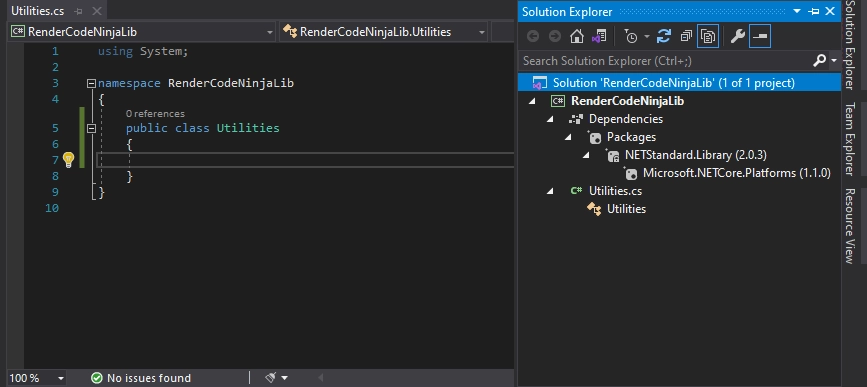 Fig 1.3 - Empty Utilities class
For our Utilities class to have some demonstrational functionality, I implemented a replica of Unity's Mathf.Lerp() as a static method named as CustomLerp(). You can add your algorithms, logics or complex calculations into your library as required. Once we compile this code into a DLL and import it into a Unity project, we can simply invoke this method by referencing the namespace of the DLL.
csharp
1using System; 2 3namespace RenderCodeNinjaLib 4{ 5 public class Utilities 6 { 7 // Static method to interpolate 'a' to 'b' over 't' 8 public static float CustomLerp(float a, float b, float t) 9 { 10 // Clamp interpolation time value within 0 to 1 11 if (t < 0.0f) 12 { 13 t = 0.0f; 14 } 15 else if (t > 1.0f) 16 { 17 t = 1.0f; 18 } 19 20 // Return interpolation result 21 return a + (b - a) * t; 22 } 23 } 24} 25
You can build the project into a DLL by choosing Build > Build Solution from the Visual Studio menu bar or simply pressing the F7 key. Visual Studio will now compile and build the project solution into a dynamic link library file. Depending on whether you choose Debug or Release solution configuration the DLL file will be generated in one of the following locations.
- Debug Config -
<Project Folder>/bin/Debug/<Assembly Name>.dll - Release Config -
<Project Folder>/bin/Release/<Assembly Name>.dll
 Fig 1.4 - DLL build console log
In the above screenshot, you can see that the code is successfully compiled and generated the DLL file as RenderCodeNinjaLib.dll using the Debug configuration.
Using the compiled DLL in a Unity project
To use this with a Unity project, you need to place the generated DLL file within your Unity project's Asset folder. As a best practice, I would recommend placing DLL files under the Plugins folder as Assets/Plugins/<AssemblyName>.dll
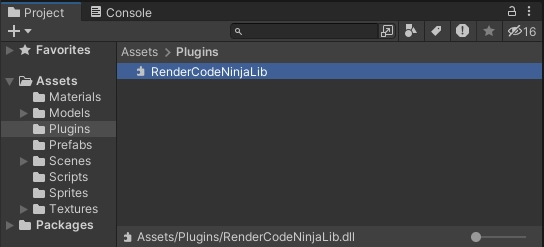 Fig 2.1 - DLL added to Unity project
Once the newly generated DLL file is imported into your Unity project, you can access the methods and properties defined in the library by including the namespace of the library in your Unity script files. See how the CustomLerp method from the Utilities class is accessed from the imported DLL file within a Unity script file.
csharp
1using UnityEngine; 2using RenderCodeNinjaLib; // Imported the namespace from the DLL 3 4public class MyUnityComponent : MonoBehaviour 5{ 6 // Interpolation stat and end value 7 private float mStartValue = 0, mEndValue = 25.0f; 8 // Interpolation current time and duration 9 private float mLerpTime = 0.0f, mDuration = 3.0f; 10 // Current interpolation value 11 private float lerpValue; 12 13 // Update is called once per frame 14 private void Update() 15 { 16 // Our custom float value lerp 17 lerpValue = Utilities.CustomLerp(mStartValue, mEndValue, mLerpTime/mDuration); 18 // Update lerp time 19 mLerpTime += Time.deltaTime; 20 } 21} 22
Adding Unity functionalities into your DLL
So far, we have created the custom library using only the Dot-Net Standard as a dependency. If you wish to use Unity classes and functionalities within your custom library, you need to add Unity DLL files as assembly dependencies to your project. Right-click on Dependencies under the project solution and choose 'Add Project Reference...'. Click on the 'Browse' button and select the UnityEngine.dll file which can be located where the Unity Engine is installed ...Editor\Data\Managed\UnityEngine.dll) in your machine. This will let you use classes, properties and other definitions from the Unity engine into the DLL you are compiling.
You may notice that the UnityEngine.dll also gets copied to the output folder along with your <AssemblyName>.dll file. If you don't want Visual Studio to copy external assemblies to the output folder, you could set Copy Local to No under Properties of that specific referenced assembly DLL file.
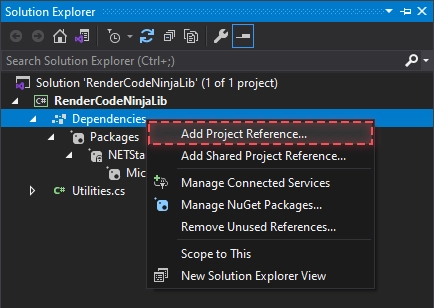 Fig 3.1 Adding external library reference
Once you add the UnityEngine.dll to your library project, you can see it's listed under Assemblies within the Solution Explorer.
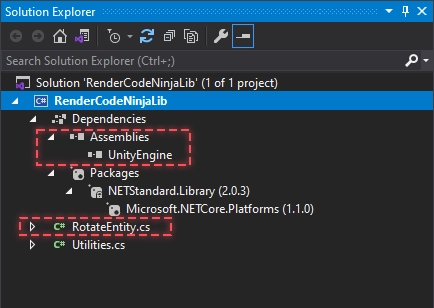 Fig 3.2 Added UnityEngine.dll as reference, new RotateEntity class file
Let's write a component class for Unity within this library project, named RotateEntity.cs. This Unity component class will reside within our library DLL and can be attached to a gameObject once our DLL is imported into a Unity project. The RotateEntity component will rotate the object to which it's assigned in the Y axis by a certain speed factor.
csharp
1using System; 2using UnityEngine; 3 4namespace RenderCodeNinjaLib 5{ 6 public class RotateEntity : MonoBehaviour 7 { 8 // Inspector property to change rotation speed 9 [SerializeField] private float speedFactor = 1.0f; 10 11 // Update is called once per frame 12 private void Update() 13 { 14 // Rotate the object in Y axis to which this component is attached 15 transform.Rotate(Vector3.up * Time.deltaTime * speedFactor); 16 } 17 } 18} 19
Compile the library project solution again by clicking Build > Build Solution (or press F7) to rebuild the DLL with the new code changes applied. Replace the old DLL file with the newly built one in your Unity project. Once Unity recompiles everything after you replaced the DLL file with the new one, you can see the RotateEntity class component is listed under Component > Scripts > RenderCodeNinjaLib > Rotate Entity
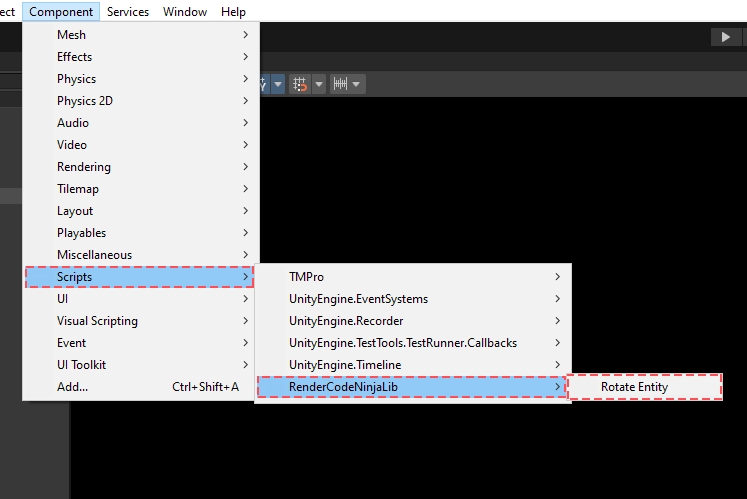 Fig 3.3 RotateEntity from DLL listed under Scripts
You can assign the RotateEntity component to a gameObject and it will behave just like any script component written inside Unity since it is derived from MonoBehaviour.
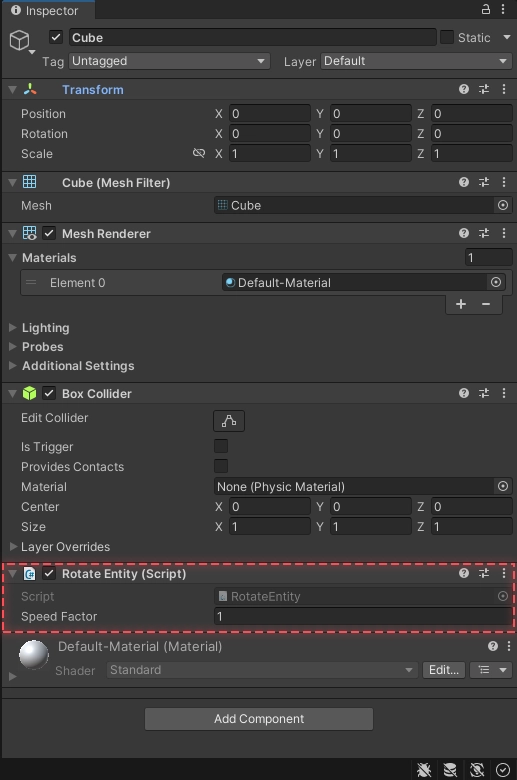 Fig 3.4 RotateEntity from DLL assigned to a Unity gameObject
This way you can create DLLs to enhance your Unity development approach by providing access to additional functionalities, improving your code accessibility across multiple projects that share the same functionalities, and allowing integration with third-party tools and libraries.
Cheers to your coding journey! 🍻